Hello, camera lovers! In this beginner’s guide to DSLR camera buttons, I’ll make sure that you’ll know each and every function these buttons offer. I am 100% sure that after reading this article, you won’t be a beginner anymore.


Using a DSLR camera for the first time can be overwhelming, I mean, there are numerous buttons on the camera, and it can be daunting to figure out what button to press and what each button does. If you’ve purchased or are looking to buy a new DSLR camera and are curious about how to use it, then this post is for you.
Earlier, we dived into how to use a DSLR. Today, let’s a quick run-through of some of the essential buttons of a DSLR and their uses. The reference camera I am using for this section is the Canon EOS Rebel T3i. Even though the buttons might be placed at different locations depending on your camera type, all the buttons perform the same function, regardless of the camera type.
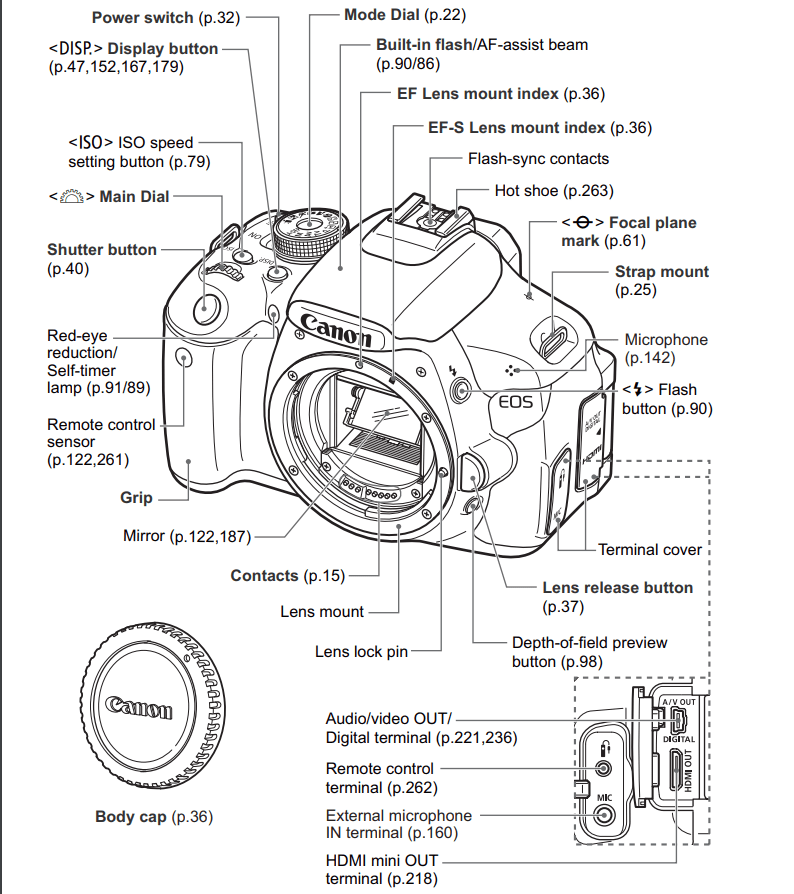
1. Power Button
The power button switch allows you to turn on or turn off the camera.
2. Mode Dial
The mode dial is found just above the power switch, and it allows you to choose between the various automatic and manual modes. The P and Auto modes on the dial allow the camera to handle everything for you automatically. We will discuss the other modes in subsequent chapters.
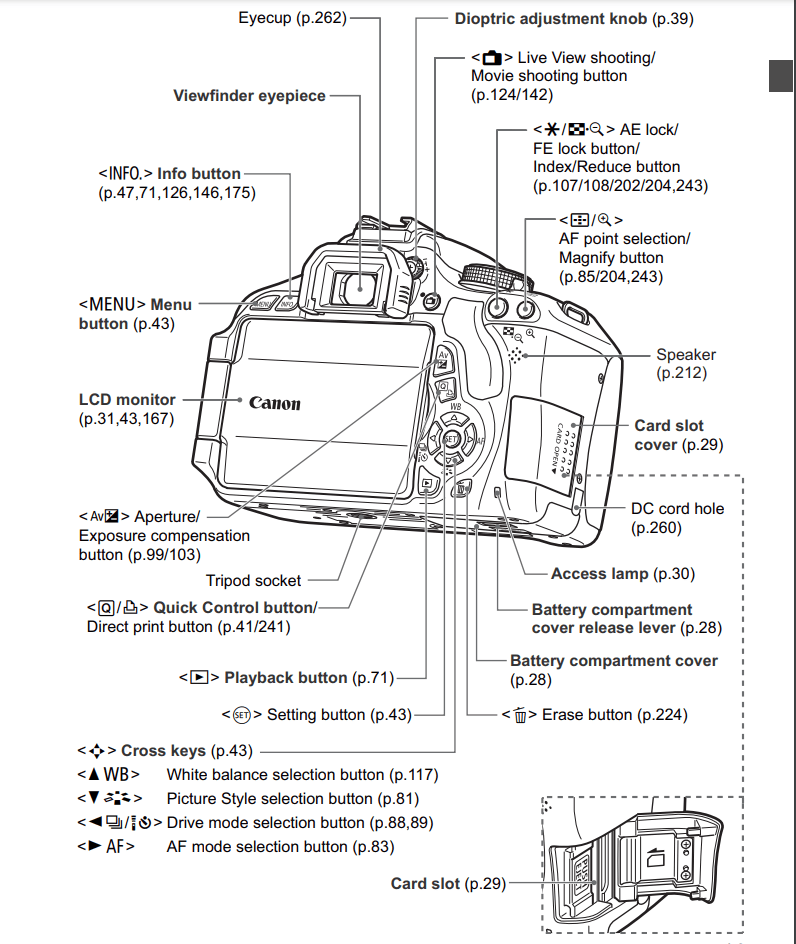
3. LCD Screen
The LCD screen displays all vital information about the camera. This includes your battery life, file type, the various settings you are using, and everything.
You may also open the screen, just in case you want to shoot a video.
4. Accessory Shoe
This is the small bracket found on top of the camera. Just as the name implies, the accessory shoe accommodates any accessory you will be using for your shoot. These accessories include lights, microphones, and any other accessories you need.
5. Menu and Info Buttons
These buttons are found on the top left of the LCD screen or the left of the viewfinder.
The menu button allows you to access all the camera settings and functions.
The info button provides information about your settings, geodata, and information on your files.
6. Set Button
This button is found at the bottom right of the screen. The set button comes with a cluster of four buttons surrounding the set button, and we will run through the functions of each.
Drive Mode button
General The button to the left of the set button is the drive mode button. This button allows you to choose the frequency of your shot, whether you want to shoot in burst mode, single shot, multi-shot, self-timer, and many more.
AF button
The button to the right of the Set button is the AF button, allowing you to choose an autofocus mode for your camera.
WB Button
Above the Set button is the WB, which stands for White Balance. And this button allows you to adjust the color temperature of your camera to match that of the light source.
Setting Button
General The Set button found in the middle of the four buttons allows you to accept any settings you have done.
7. Play and Delete Button
Just as thier names imply, these buttons allow you to delete an image or play a video.
8. AV and Q Button
Just above the WB button, you will notice two extra buttons. First, the AV button allows you to adjust the camera’s aperture in manual mode.
Just beneath the AV button is a Q button. When pressed, this button allows you to use the four keys surrounding the Set button as directional keys for navigating the menu on the LCD screen rather than the functions we specified above.
Conclusion: So now what’s your thoughts on DSLR camera buttons and their functions?
So, this has been the guide to about basics of DSLR cameras. In other words, it clears doubt about the standard buttons found on modern DSLRs.